Home

Wednesday, January 19, 2022

DIY Mirror, Mirror On The Wall


DIY Mirror

If you remember in my last post I mentioned that I thought I had found the perfect piece to hang above the bed and here is it.

Would you believe this piece actually started out as a piece of art?  I found it at a Peddlers Mall.  It was hidden in the midst of a lot of  other cheap, ugly pictures but this frame caught my eye immediately and it was a steal for only $10...woohoo!

And here is the big before reveal!  Can you believe this is what it started out as?


It's not terrible but it definitely wasn't for me.  I did discover a couple of interesting things when I removed the backing and took the picture out.  The artwork is an original.  I'm not an artist so there's a good chance what I'm about to say is totally wrong but I think it done using oil pastels.  It has an oily waxy feel to it so I assume that's what it was done with.

When I found this picture I was a little perplexed because the picture and the frame didn't seem to be from the same time period.  The picture was more modern in comparison to the frame and I assumed someone has reused an old frame.  It was when I was putting it back together that I discovered someone had taped the picture on top of what I assume was the original piece of art that was in the frame. 


I'm sure its a priceless work of art and just my luck its ruined by having tape on it.  Oh well, I wasn't interested in the piece for the art, it was the frame and the glass that I was interested in.

So...now you know how it started out and what it looks like now.  In this post I'm going to show you how simple and easy it was to transform this into a vintage looking mirror.

Here's the necessary supplies to transform glass into a vintage, mercury glass mirror.  All you need is a piece of glass, Rust-Oleum Mirror Effect spray paint, a rag and a spray bottle with an even mixture of vinegar and water and you are ready to make your own vintage looking mirror


PS...probably not my smartest decision when I decided to do this in our basement.  The odor was quiet strong but it was to cold and wet to do it outside...the things you do in the name of DIY.


The process to converting glass to a vintage mirror is simple.  Apply a thin coat of the mirror spray, mist the glass with the vinegar water mixture and blot it dry with a rag.  I used a cut up t-shirt because its soft.  I was afraid other rags would be to rough and take off to much paint.


Repeat these steps six times and let it dry thoroughly before you place it back in the frame.  I did have to fix a couple of spots where the vinegar water spray was a little heavy and I took off to much paint.  Its was an easy fix since the mirror is supposed to look like mercury glass.  

You could use a smaller picture frame and write a note to your overnight guests and include your Wi-Fi password or put one beside your bed and write yourself a positive note to wake up to or if you're like me write a reminder to yourself to pick up bread and milk, etc.  You could also do this with a vase or any other clear glassware.  


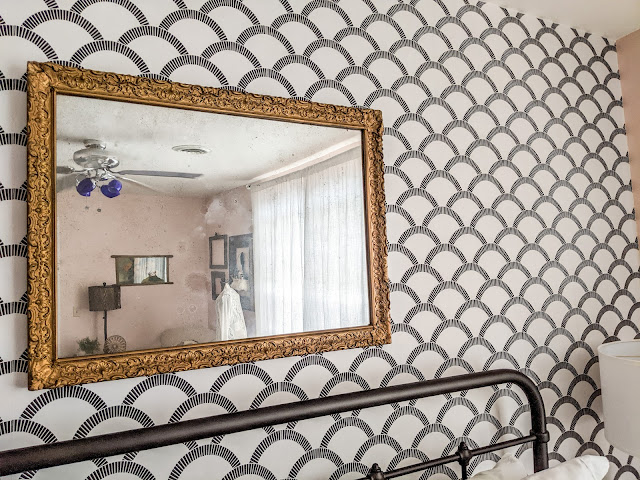
Of course the frame isn't n perfect shape but that's ok with me, I like it better that way.  She's showing her age and she's hung around for a long time now...get it hung around.  That's my attempt at a little humor.  It's not my best but it's all I've got at the moment.


Look how sweet my other Peddlers Mall find reflects in the mirror.


It looks like an old mirror instead of a brand new one.


I'm pretty happy with how it turned out.  It's much cheaper than going out and buying a new one and the satisfaction of another do it yourself project makes it even better.

Give it try and see what you can come up with.  

Until next time stay safe and warm my friends!

~~Jennifer~~
 

Monday, January 17, 2022

Bedroom Makeover Almost Complete

Almost Done 

My blogging is hit or miss and truth be told its more miss than hit but I still enjoy doing it.  I actually have several posts started that haven't been completed and this is one of those.  Its only been sitting here waiting to be finished for almost two years now so I decided to finish it finally.

What was once a little boys room finished in colors of navy and gray surely doesn't look like a little boys room anymore.  I started this room makeover in 2020 and its still a work in progress.
Its amazing the things you find hanging in the darkest corners of a closet.  Sometimes those things give you a glimpse into the little boy that use to occupy that room and you realize why you didn't have the heart to part with them.  They are pieces from the past that stir the memories of their younger years and of my younger years as his mother.  And yes that little shirt is still hanging in the closet...

Enough of the sappy stuff for now so I'll move on to the progress of the room makeover.  One of the things that makes me happy is to see how a couple of brushes and a bucket of beautiful paint can transform a room. 


Paint Color is Romance by Sherwin Williams


You can't tell it from the pictures but I added some painters sand for texture.  It was a little to rough for my liking so I sanded it down some.  It still gives it texture but won't take the hide off of you if you brush against the wall.  

I decided to do a focal wall and after looking for ideas I found this amazing peel and stick wallpaper on Pinterest.  Some say its easier than working with regular wall paper but it did take a little getting use to.  With regular wall paper you can slide it around on the wall to line it up but you can't do that with this.


I love the way the wall paper turned out even though I did waste a lot of it before I finally got the hang of working with it.


I have so many favorites in this room but I'm thinking I might love these night stands most of all. 


And of course if you know me you know how much I love vintage treasures so of course I had to include some of those.  Shopping at peddlers malls, Goodwill and auctions is one of my most favorite past times.  


Its not totally finished as you can see there's still the issue of the light that is in desperate need of being changed.  I'm still looking for just the right one and haven't found it yet.  I'm open to suggestions so if you have any you want to share please feel free to do so.


Still looking for just the perfect piece to hang on the wall over the bed but I think I may have found it.  I'll let you know how it turns out once I get it done.  

And yes I know, I really should have ironed or steamed that bedskirt .


Happy painting until next time my friends.


Thursday, January 30, 2020

Any Busy Moms Out There Looking for a Quick Supper Fix?

Quick and Easy Air Fryer Chicken


Got an air fryer?  If so here's a recipe you will love!  Its simple, its easy and fast but most of all its DELICIOUS!!  

How many others out there work long hours?  You leave early get home late and as soon as you get home that question that has been asked for thousands of years gets asked again..."What are we going to have for supper"?  If you are like me you want to scream because you have no idea what you can whip up quickly so that you can eat at a decent hour.  Well...I've got you covered here sweet friend.  Read on and see how simple this recipe is, I think you will be much surprised!

Thankfully the hubby stopped by Kroger and picked up a few things including this small fryer chicken.  I had planned to cook it in the Instantpot but decided to go a different route this morning when I got up.  


I have friends at work who are always cooking something in the air fryer or talking about something they cooked in it so I decided I would try it out for myself.  Up until this morning the only thing I really used my air fryer for was french fries.

I couldn't find the exact recipe I wanted so I decided to combine a couple and see what I ended up with.  The lighting isn't very good in this picture but you can see I have a small air fryer and this chicken was a little under four pounds.  Even though it was a bit of a tight fit it still worked out great! 


Want to try this for yourself?  Here's the recipe:

(1) 3-4 pound frying chicken
2 Tablespoon butter softened
1.5 teaspoon kosher salt
1/4 teaspoon black pepper
1/2 teaspoon paprika
3/4 teaspoon garlic
3/4 teaspoon onion powder
1/2 teaspoon dried rosemary
1/2 teaspoon ground thyme
Emeril's Essence (not required)

Combine all of the dry ingredients in a bowl and set aside.  
Remove the giblets from the cavity and rinse the chicken then pat dry.
Take your hands or a spatula and run under the skin to separate it from the meat.  
Spread the softened butter on the meat and then sprinkle  part of the seasoning over the meat.  
Pull the skin back over the meat and rub the remaining seasoning on the top and bottom of the chicken.
I did sprinkle a little Essence on the bottom because I got a little carried away and forgot to rub some of the other seasonings on the bottom of the bird.

Place the chicken breast side down in the air fryer and cook at 360 degrees for 30 minutes.
Turn the chicken over and cook at the same temperature for 20-25 minutes depending on the size of the chicken.
The internal temperature should be 165F (make sure you're not touching a bone when checking it).

It took me longer to figure out how I wanted to cook it than it did to make it.  Prep time probably took me about 15 minutes and once I had it prepped the rest of the time was my time to do as I wanted while I waited

Want to know the best thing about all of this???  I did it all while I was getting ready for work and I left out of the house this morning feeling like a rock star!!  I knew supper was going to be quick and easy when I got home.  

All I did when I got home was pop it in the oven for a little while to warm it up while I fixed a couple of easy and quick sides and within 30 minutes we were sitting down for supper with our plates full.


I hope you give it try and I hope you leave home feeling like a Rock Star too!

~Jennifer~


Tuesday, January 28, 2020

Picking a New Bedroom Light...What's Your Favorite


Let There Be Light


So...I'm slowly making some progress in the room makeover.  Paint and wallpaper (which I will tell you all about later) is going up and covering the dark blue and gray walls.  The next thing that has to go is that space age looking ceiling fan.  I don't remember if I picked it out or if my son did but I'm going to blame that one on him.  Please don't tell him because I'm sure he will quickly deny that he had anything to do with it.  BTW...it will be for sale if anyone is interested in it.


So...now I'm reaching out again to ask you...Which light should find its way to my house?  After perusing thru the lighting at Lowe's and after long hours of looking online for the perfect one I'm still undecided if I made the right choice.

  I've picked out a few of my favorites and to be honest I have already bought one but I'm not sure if I'm going to put it in there, pot it someplace else in my home or return it.  

Lighting is expensive and I don't want to spend a lot of money on it so after searching Anthropologie, Restoration Hardware, Pottery Barn, Home Depot and on and on....I picked out some that I like.  

Look at the options below and tell me which one is your favorite.


Industrial Crystal Pendant Light from Amazon


Brushed Nickel Drum Semi Flush Light from Amazon


Rustic Drum Chandelier


 Wood Bead Chandelier
Wood Bead Chandelier from Amazon


Jonathan
Jonathan Light from Home Depot


Anyone else detect a theme for most of the lights?  Fringe and beads...I guess my Hippie/Boho love is showing isn't it?

Do you have any other favorites you want to share?  Please feel free to, I'm open to suggestions.

Have a wonderful day friends!
~Jennifer~


Wednesday, January 22, 2020

A Few of My Favorite Amazon Finds

Trays, Lights, Frames and More

Any Amazon shoppers out there?  I think I know for sure that there are a few that enjoy the thrill of finding just the right thing and with a click or two it ends up delivered to your door in just a couple of days.

For those of you who shop Amazon I thought I would show you a few of my favorite Amazon finds.  Maybe you'll see something and decide you need one of these too.  For those who don't shop with Amazon maybe you'll decide that you need to start.


Its hard to decide what my favorite Amazon find has been but this large beautiful rustic metal tray ranks right up there at the top.  I don't remember where I first saw it but I was instantly drawn to it and knew that I had to find it.  After a little searching I found it on Amazon and with a couple of clicks and a few days wait it showed up on my step...kudos to the UPS drivers who work so hard to get our treasures to us so quickly.


For the wine lover out there I have to tell you about Purple Toad wine.  It's made here in the great state of Kentucky and boy is it good!  My favorite Purple Toad Wine so far is the Black and Bruised.  It's sweet, probably to sweet for most wine lovers but for me it is perfect.  A word of caution though, it's like drinking kool-aid so be careful, you'll drink the whole bottle before you know it.

And as an added plus for the wine...those bottles are the prettiest blue you have ever seen.  Once the bottle was empty I just couldn't bring myself to throw it away.  I peeled the labels off and held on to it (them eventually).  Side note..not all of their wines are bottled in the vibrant blue color in case you decide to try something other than the Black and Bruised.
Distressed Black Tray


Once I had a little collection of them (I even had friends bringing me their empties) I decided I wanted to use them as a lighted display on a bar cart/tray.  I'm still trying to figure out what to do with the others I have.  By the way...how cool are my vintage glasses...I scored the whole set for cheap at an auction!  

After a little amazon searching I found this box of 10 cork lights and they came with extra batteries.  They were a good deal coming in at just a little over a dollar per strand.


Another of my favorite Amazon finds is this simple black picture frame.  If you have priced frames lately you know they are not cheap and of course the larger the frame the more expensive it is.  

Craig Frames


Joanna Gaines featured this family tree in one of her magazines and I fell in love with it.  I did a little research on Ancestry.com and got all of my names together then placed my order through TheMakeshiftGallery on Etsy.  


This frame is matted and has a thin acrylic facing instead of glass which makes it more lightweight for hanging.  These are actually hung using Command Strips...aren't those one of the greatest inventions ever!

Command Picture Hanging Strips


This frame I own because I grossly mis-measured when I ordered it.  I obviously wasn't thinking clearly...can I blame it on the wine? In all honesty I had the family tree print for awhile and thought it was 20x20 but guess what...it wasn't.  Rather than send it back I decided to keep it and use it to hold a family photo, which by the time I got it ordered and hung up was already out of date.  Our sweet, handsome little grandson has been born since this picture was taken so we will soon need to update the frame with a new photo.   

ArtToFrames Double Mat Frame


I ordered our picture from MPix and was very pleased with the quality of their prints.  Where do you order your prints from?


The frame is lightweight, the facing is acrylic so there's no glass to have to worry about getting broken and the textured matting adds just the right touch. 

The frames come in different sizes so be sure to check them out and see if you find one that fits your needs.  Also be sure to check out TheMakeshiftGallery on Etsy and shop small when you can.  

Happy Wednesday friends!  I hope your day is filled with blessings and happiness!

~Jennifer~